Monday, January 17, 2011

Fuel Gauge

The fuel gauge hasn't worked since I got the car.  The previous owner pulled the sending unit out the upper tank located in the trunk. After cleaning and reassembling the sending unit, my fuel gauge still didn't work.

I then began studying the chassis wiring diagram for the car so that I could check continuity of the wire connecting the fuel gauge to the sending unit.  I discovered something very strange:
Check out number 182 & 250.  The sending units are wired in series.

Upper, trunk located tank.
After looking at the wiring diagram, I was quite confused about this secondary sending unit.  I put my car on my dad's lift, and quickly located the second sending unit....it was in a lower tank that I didn't even realize the car had.
Notice the large "T" hose that connects the filler neck to both of the tanks.
The second sending unit is just to the right of the large hose.

The "float" had a hole in it and was filled with diesel, so I drained it and chemically welded the hole closed (super glue).  The rheostat was also lightly corroded, so I cleaned it with 1200 grit sandpaper. 

I tested the rheostat with a multimeter before reassembling it.  The resistance to ground gradually increased as the float level increased.  

I put the sending unit back in the tank, and now I have a working fuel gauge.  Praise Jesus!

Seat Belts

I purchased this vehicle with the intent of hauling passengers.  This goal was disabled by rear seat belts that did not tighten across the front of the passenger.

Assumed problem: Broken retractor springs
Relaxed position, any orientation (Can you tell it doesn't work?)

Check out the Tri-Wing heads!
Actual Problem: disconnected retractor spring.


Reattached retractor spring (added bend to tip to prevent future disconnect)

Manually disable orientation lock in order to re-wind spring

I re-wound the spring by disabling the orientation lock and rolling the belt back onto the assembly.

Final product: Properly operating seat belts. Praise the Lord!

Loose gear shift knob

Since I got this car, the gear shift knob has been loose.  Often, it would come off in my hand during gear shifts. I'm pretty sure that the knob was a light press-fit from the factory.

The fix: set screw.


I drilled a hole in the plastic knob for the set screw.

Created a resting location for tip of set screw.

Complete, with the set screw going through the knob and locking into the shaft.
After a few months of operation, I still have a secure shift knob!

Vacuum Pump

The power brakes operate off of vacuum.  Since diesels do not operate with any notable vacuum, a separate pump is typically installed from the factory to power the brakes, as well as the HVAC controls, etc.

I typically had no power brakes at idle, so I decided to disassemble the pump to fix this issue.

Location


The spring is compressed, so be careful when pulling the nut off.


The piston appears to use a brass ring that is pressed against the cylinder by a 1/4 OD o-ring. I honed the cylinder walls, hoping that oil would stick to it better.
Below this steel cover is an o-ring and a brass fiber bushing for the rod.


Brass fiber bushing.

Reassembled using hydraulic press, would be very difficult otherwise.

Fully assembled, ready to install.

After installation.


Now, the pump pulls a strong enough vacuum at idle to enable power brakes.  Exciting! It just needed a good cleaning and honing.

Head gasket and misc

Over Thanksgiving weekend 2010, after spending time with my family I was fairly busy.


  • Rebuilt fuel injectors:

Before
After 5 hrs in ultrasonic cleaner & wire brushing
  • Replaced head gasket:
Original block and pistons (with gasket)
Prepared block and pistons (with new gasket). I used the old head bolts to make alignment pins.

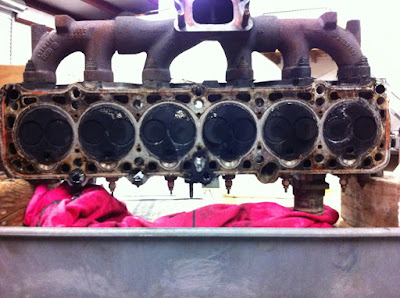
Original head
Prepared head (light cleaning)
Homemade alignment pins:
I cut the bolts heads off and cut a slot into the top of the original bolts.
  • Rebuilt the deteriorated engine wiring harness.  The factory routed the harness underneath the oil pan and beside the oil filter, so that every time the oil filter is changed, the wires get covered in oil. I routed it along the firewall.
  • Advanced the injection timing about 5 degrees from the factor specification.
  • Replaced the water pump o-ring
  • Replaced the injection pump timing belt
  • Replaced the camshaft timing belt.


Total time required: 34 hrs.